
And this is how it began. Few months past I was doing my first mandalorian build from PVC sheets but some metal armors were catching my interest.
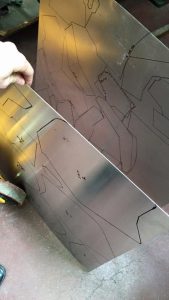
So I’ve search wich material was the best and how to make it turn good. As I was making 3 armors at the same time I bought 3m² of aluminium sheets (1mm thick). This is « Duralumin » used in aerospatial, pretty good quality. Why 1mm ? Because it’s enough for a build like this. You can easily bend or cut it and this is not heavy to wear ! A good point when you have to wear it something like 8h per day during conventions…
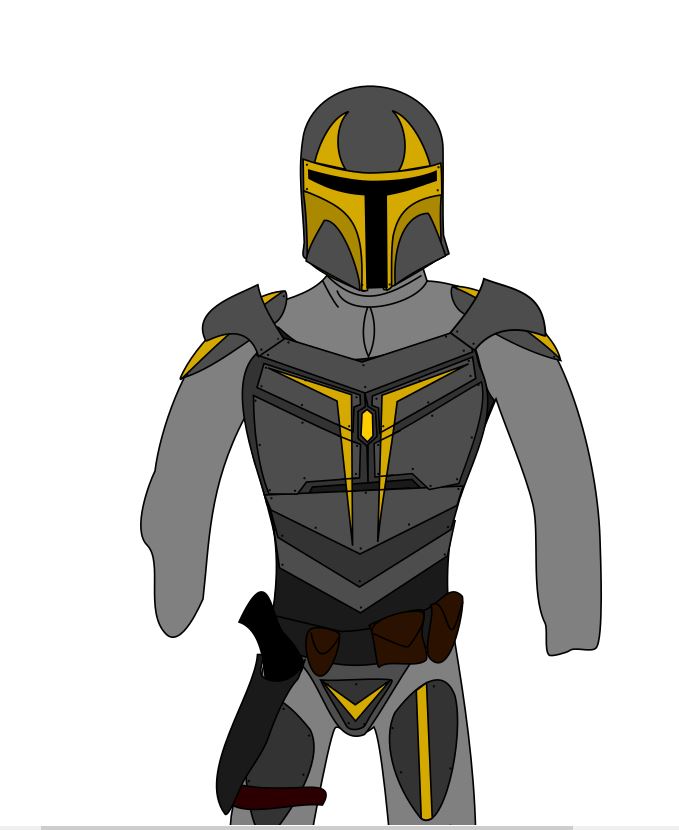
First thing to do when you are building a mandalorian armor or whatever its to draw your goal. You need to have a goal and a deadline. Ive choose a Legacy armor for the look but some parts where not good looking to me. The drake legacy template (you can find it on the mandalorian mercs costume club website) was a good base, I love the chest so much !
So I draw, no. Sorry Im lying, I just can’t draw something good ! So my friend draw this one you can see on the top and I add the layering (the plates above the plates), do the color schem and think where to put rivet. It was very important for me to have apparent rivets, to give a « prototype » looking on this armor. My mandalorian crew is after Star wars 6th so this is the modern era armor like boba fett. But I wanted to introduce the new gen of armor (legacy now) while remaining on the modern era. So it had to look like a prototype. The rivets were a good way to give that appearance of « not on point ». To get a good visual I had to use two kind of differents rivets, 3mm aluminium for large surface and <2mm steel for fixations (leather, collar etc).

Next step is to assemble differents parts and adjust. Not the easy one but the most greatfull. You see your Beskar’gam going to life.

As its a symetrical armor with layering there is a lot of little things to pay attention. Edges have to be perfectly aligned. On this pictures you can see a lot of little mistake which can ruin your whole armor. The good things when making a Mando armor is the weathering, you can hide little things by using blaster effect, rust or wear.
Now it need to be perforated to rivet. I will not expand on how to rivet aluminium you can find a lot of tutorial on google. Or if you want to know ask me on facebook.
My armor used something about 120+ rivets, most are for keeping the armor on a good shape and some are for style. Style is very important when trooping in armor. To be a mando is important, but with style its better.

On the left fixing the small rivets
On the bottom The torso fully riveted, with the 2 layers its pretty rigid !

When all rivets were fixed I just have to clean the aluminium and prepare it for paint. When painting I use a good primer for professional. The aluminium is a fat metal so paint don’t hangs well on it. So it better to sand a little before applying the primer.
Before painting you have to mind what kind of armor you want, should it be brand new, just after a battle or veteran style with a lot of battle damage and holes. You need several colors to do a good weathering. I recommand to use at least 2 mains colors and max 3. In my case it’s gold and black ! I wanted an armor with some little battle damage and as I painted on aluminium will use the raw color for it.
So I buy 3 cans of color: Mat black, Shiny Gold and Dark Grey. First Apply the prime, 2 or 3 coats, you can sand after each coat. Then the dark grey, its usefull to do a degraded with the black and the grey aluminium. Just after 2 coats of dark grey and one on the interior, 3 coats of mat black. The best one is the barbecue black mat. Its intense and deep.

If you want to do weathering on non-metalics surface you have to use masking fluid. Here I prefere do the weathering naturaly. So gravel, dirt, metalic brush and dremel !
Sorry on the following parts I lost pictures… But the next step is the gold finish. For masking tape I use Frogtape, don’t mess on ductape a bad one will ruin your paintjob… For Mythosaure, characters and logos just use some templates printed on thick paper and apply it with brushes.
When paints was done I just use my old gold visor, tink a little range finder with pc square and eletronic cigarette power supply. Gauntlets are from my first build, its pepakura as the helmet. Flighsuit, boots and gloves are bought. Flakvest and capes are sew by professional tailor. Cod and scholarships are handmade.

Next step is:
-New gauntlets with personal desing,
-New helmet (unique)
-Weapons (Im mandalorian with no weapons, a real joke)
-New scholarships
Thanks for reading ! For any question feel free to ask on Facebook. Im parts of the Mandalorian Mercs Costum Club but not yet official member.
~ Lynnfield